Showing posts with label dinner. Show all posts

Wednesday, May 11, 2016

Roasted Green Bean, Chicken & Potatoes (One Pan)


When I had jaw surgery and members of the Relief Society were bringing in meals for my family, my visiting teacher Feleicia brought this dish in and Paul and the girls gobbled it up.  So once I could start eating regular food again, I found the recipe on Pinterest and made it myself and it was absolutely delicious and so, so easy.  Definitely a keeper for an easy weeknight meal.

Roasted Green Bean, Chicken & Potatoes

INGREDIENTS

12 ounces green beans
1 lb. boneless, skinless chicken breasts, chopped into 1-inch pieces
1 lb. small red potatoes, diced
1/4-1/2 cup butter (I made this according to the original 1/2 cup instructions but felt like the amount of butter could have easily been cut in half)
1 small envelope Zesty Italian dressing seasoning
Salt and pepper

DIRECTIONS

Preheat oven to 350 degrees.  In a 9x13-inch baking dish, arrange green beans, chicken and potatoes in 3 vertical rows, side by side.  Cut the butter into thin slices and arrange evenly around the pan on top of the green beans, chicken and potatoes.  Sprinkle the Italian dressing packet evenly over everything and then salt and pepper the dish to taste.

Bake uncovered for 1 hour, until the chicken is no longer pink and the potatoes are soft.  If the green beans start looking overdone around the 45 minute mark, place foil over the pan for the remainder of the cooking time.

Source: High Heels & Grills (although I saw this pinned to other sites online and have no idea where the original version came from - my guess is this is one of those dishes that has been around for years and nobody knows who created it)

Thursday, March 10, 2016

Knoephla

Many of the descendants of the people in North Dakota are Germans who left Germany and settled in Russia. They were eventually driven out of Russia and settled in the midwest region of the United States. So they call the food German, but a native German may not have ever heard of the dishes they serve. We have really enjoyed tasting the different German foods and learning to make some of them. This is our favorite. 


4-5 Carrots, sliced  

1 Onions, chopped
2 stalks celery, sliced
½ stick Butter
1 Tbsp Lowry's Seasoning Salt, basically to taste, not sure exact measurment
3 cups Flour  
1 cup Warm Water
1 Tbsp Salt  
1 Egg 
4 cups Chicken Broth
2 cups Heavy Cream, or more

*I have had knoephla with diced potatoes, so those could be added also.


Cut up vegetables.
Sauté onion, carrots, and celery in butter with Lowry's seasoning salt.
Mix dough ingredients in kitchen aid with dough hook. 
 Boil water.  Cut dough into boiling water and cook for 10 minutes.  
Drain knoephla and put back in pan, add veggie mixture, chicken broth and cream.  Season to taste with seasoning salt. Simmer 1 hour.
Enjoy!


Wednesday, June 24, 2015

Paul's Award Winning Smoked Baby Back Ribs


Paul, Clara and I visited my Uncle Richard and Aunt Diane in Virginia one year and Richard (who looks so much like my dad that it is scary and who always tells me that he is my favorite uncle) made these incredible ribs for us on the smoker. So they are really more my Uncle Richard's ribs.  But Paul has adapted them and made them him own and entered them in our ward's Elders Quorum cookoff where they won 1st place so now they are just as much his as Uncle Richard's.  They really are the best ribs ever and were the driving force behind us getting a smoker of our own.


The funny story behind these ribs is that when we got home from our trip and Paul was reminiscing about the ribs, he was 100% convinced that my uncle had grated cheese over the ribs and that somehow they were cheesy ribs.  He totally thought I was pulling his leg when I explained that it was butter that Uncle Richard had been grating over the cooked ribs.  I was laughing until my belly ached over the thought of cheesy ribs and Paul's confusion.


Paul's Award Winning Smoked Baby Back Ribs

Rub
 
2 tablespoons ground black pepper
1 tablespoon salt
1/2 teaspoon chili powder
1/2 teaspoon onion powder
1/2 teaspoon garlic powder
2 teaspoons paprika
 
Ribs  
 
Dr. Pepper
Baby back ribs
butter, grated
brown sugar
honey
apple flavor wood pellets

Marinate the ribs in Dr. Pepper (in an extra large Ziploc bag) overnight (don’t put in marinade until just before bed). When ready to smoke, start the smoker on “Smoke” with the lid open for at 3 to 5 minutes to get a good smoke established, then close the lid and set the smoker to 225 degrees.
              
Remove ribs from Dr. Pepper and discard the soda. Pat ribs dry with paper towels. Lightly coat both sides with olive oil. Apply even coat of rub to both sides. Place ribs directly on grill, meat side up. Smoke until rib meat ’breaks’ when lifted in the center (2 1/2 to 3 1/2 hours). Remove from smoker and place on extra large sheet of aluminum foil. Grate butter on top of ribs, then sprinkle with brown sugar and drizzle honey over the top. Tightly wrap ribs with the foil and return to the smoker for another 20 minutes. Remove from smoker and let sit for 10 minutes. Then cut into individual ribs with sharp knife. No barbecue sauce.

Monday, June 22, 2015

Pan Seared New York Strip Steak


This is a restaurant quality, pan-seared New York strip steak and it is one of our favorites. I learned how to cook steak this way by reading a bunch of tutorials and watching videos online of Gordon Ramsay and Jamie Oliver cooking steak and then trying it out myself. It is honestly easier than it sounds and tastes absolutely amazing.

Pan Seared New York Strip Steak

1 12-ounce New York strip steak
1 tablespoon olive oil
3/4 teaspoon coarse salt, or to taste
1/2 teaspoon coarsely ground pepper, or to taste
2 tablespoons butter
1-2 sprigs of fresh thyme
2 garlic cloves
 
Pull steak out of refrigerator about 30 minutes before you plan to cook them. This step is VERY important to bring them up to temperature.
              
Drizzle steak with olive oil, then sprinkle salt and pepper evenly over steaks and press or rub it into the meat. Heat a large cast-iron or heavy skillet over medium-high to high heat so that it gets very hot and if you sprinkled it with water the water would dance around and evaporate almost immediately. Turn your fan on to high because when you start cooking the steak you will definitely need it.
              
Carefully add steak to the pan and then don’t touch it! You want to sear all sides of the steak really well and develop nice caramelization on all sides that will hold in the juices. Let the steak sear on the first side for about 3 minutes, then flip using tongs (not a fork - you don’t want to pierce the meat and give the juices a way to escape) and sear on the other side for 3 minutes. Using the tongs, be sure to sear the side of the steak that has the thick layer of fat (a good New York strip steak has one) for a minute to melt some of the fat and crisp it up. Reduce heat to medium-low and add the butter, thyme and garlic to the pan. Carefully grasp the pan handle using an oven mitt and tilt the pan toward you so the butter pools; using a spoon, baste the steak with the thyme-garlic butter constantly for another 1 1/2-2 minutes. This should give you a nice medium-rare steak that is very pink but warm all the way through. Total cooking time is about 3-4 minutes per side (so 6-8 minutes total) for medium rare, and about 5-6 minutes per side (so 8-10 minutes total) for medium (please don’t cook your New York strip to well done). The best way to tell doneness is by testing the firmness of the meat by pressing on it with your fingers. A medium rare steak will feel the same as the fleshy mound on your hand, just below the thumb.
              
Remove steak from the pan to a plate and let it rest for 10 minutes. This is another important step because it lets the juices disperse through the meat. If you cut it too early, all the juice will just leak out.
              
Cut steak diagonally across the grain into thin slices. Discard thyme and garlic and spoon the reserved butter mixture over the steak.

Panuchos


We had an amazing trip traveling around the Yucatan peninsula in 2009 right after graduating law school and I remember eating panuchos and salputes in Vallodolid.  The are sort of like a tostada except softer and with beans fried in a sort of tortilla shell.  It is all my favorite flavors or Mexico.

Panuchos

2 cups masa haraina
3/4 teaspoon salt
1 1/3 cups water
Mexican refried black beans (still searching for just the right recipe although this one is the next one I want to try - the one I used this time around was just so-so)
Oil for frying
Thinly sliced tomatoes
Thinly sliced avocados
Shredded lettuce
Cooked and shredded chicken (can just use a rotisserie chicken or Taco Chicken or Spicy Honey Chicken)
Cotija or queso fresco
Cilantro
Escabeche

Combine masa and salt in a bowl, adding a bit of water at a time and working it in with your hands until the masa is pliable but not sticky (about like the texture of playdough). Divide into 15 equal balls, set on a baking sheet, and cover with plastic wrap.

Heat a heavy griddle or skillet over medium heat until hot. Working with 1 masa ball at a time, place a heavy piece of plastic (a freezer bag cut in half works well) on the counter, then center masa ball on top and cover with another piece of plastic or parchment paper. Using a large plate, press down on masa ball to form a tortilla 4 to 5 inches wide.

Peel plastic from tortilla and put tortilla on hot griddle. When underside no longer sticks and is lightly speckled, about 1 minute, flip and cook 1 minute on other side. Flip again and with a folded clean kitchen towel, firmly press tortilla all over (this helps it puff). Cook until it puffs and the underside is light golden, 15 to 30 more seconds. Transfer tortilla to a work surface.

Slit hot tortilla carefully 1/2 inches from edge to make an opening about 2 inches long. Without tearing tortilla, slide a small metal spatula or just your finger inside to create a pocket. Let cool. Repeat for each tortilla.

Open up the pocket of a cooled tortilla with your finger, squeeze gently to hold it open, and smear a rounded spoonful of beans inside. Pat top of tortilla with your fingers to spread beans. Fill each panucho the same way.

Preheat oven to 250° and set a rimmed baking sheet inside. Heat a large skillet, preferably cast iron, over medium heat. Add 2 tbsp. oil and a single layer of panuchos. Cook until golden, turning once, 3 to 5 minutes total. Transfer panuchos to pan in oven. Repeat to cook remaining panuchos, adding more oil as needed.

Assemble panuchos by setting them on a platter and topping with lettuce, chicken, onion, sour cream, tomato, avocado and cheese.

Friday, June 19, 2015

Pad Thai

Pad Thai is one of our favorite takeout foods, but unfortunately good Pad Thai can be hard to come by.  Too often it is too greasy or heavy or bland.  So I decided to learn how to make it at home.  The first time I made this I combined a number of different recipes and got the balance of ingredients a little bit off - too many noodles, not enough eggs or sauce.  So I have made adjustments below to account for those shortcomings.  It looks intimidating and while there are quite a few steps, the biggest part of the meal is just getting everything cut ahead of time so that when it comes to actual cooking time things go fast and smooth.  I found the tamarind paste at my local Asian market but you could even just order it on Amazon if you are worried about tracking some down. 


Pad Thai

Sauce

1/4 cup boiling water
3 tablespoons tamarind paste
4 tablespoons fish sauce
4 1/2 tablespoons sugar
3 tablespoons peanut or vegetable oil
1 1/2 tablespoons rice vinegar
1 teaspoon cayenne pepper

Noodles, Shrimp, and Garnish

8 ounces dried rice stick noodles, 1/8 to 1/4 inch wide
2 tablespoons peanut or vegetable oil
12 ounces medium shrimp, peeled and deveined
Table salt
1 medium shallot, minced
3 garlic cloves, minced
3 large eggs, lightly beaten
2 teaspoons water
2 tablespoons chopped Thai salted preserved radish (optional)
3 cups bean sprouts
1/2 cup unsalted roasted peanuts, coarsely chopped
1/4 cup thinly sliced purple cabbage (mostly just for the pop of color)
1/4 cup plus 2-3 tablespoons scallions, green parts only, sliced thin on the bias
1/4 cup fresh cilantro, coarsely chopped
Lime wedges, for serving

FOR THE SAUCE:  Combine the water and tamarind paste in a small bowl and let sit until the tamarind is softened and mushy, 10 to 30 minutes.  Mash the tamarind to break it up, then push it through a fine-mesh strainer into a medium bowl to remove the seeds and fibers and extract as much pulp as possible.  Stir in the remaining sauce ingredients and set aside.

FOR THE NOODLES, SHRIMP, AND GARNISH:  Bring 4 quarts water to a boil in a large pot.  Remove the boiling water from the heat, add the rice noodles, and let sit, stirring occasionally, until almost tender, about 10 minutes.  Drain the noodles and set aside.

Heat 1 tablespoon of the oil in a 12-inch nonstick skillet over high heat until just smoking.  Add the shrimp, sprinkle with 1/8 teaspoon of salt, and cook without stirring until bright pink about 1 minute.  Stir the shrimp and continue to cook until cooked through, 15 to 30 seconds longer.  Transfer the shrimp to a clean bowl and cover with foil to keep warm.

Add the remaining oil to the skillet and return to medium heat until shimmering.  Add the shallot and garlic and cook, stirring constantly, until light golden brown, about 1 1/2 minutes.  Stir in the eggs and water and cook, stirring constantly, until scrambled and barely moist, about 20 seconds.

Add the noodles and the salted radish (if using) to the eggs and toss to combine.  Add the sauce, increase the heat to high, and cook, tossing constantly, until the noodles are evenly coated, about 1 minute.

Add the cooked shrimp, bean sprouts, 1/4 cup of peanuts, purple cabbage and all but 1/4 cup of the scallions and continue to cook, tossing constantly, until the noodles are tender, about 2 1/2 minutes.  (If not yet tender add 2 tablespoons water to the skillet and continue to cook until tender.)  Transfer the noodles to a serving platter, sprinkle with the remaining 1/4 cup peanuts, remaining 1/4 cup scallions, and cilantro an serve with lime wedges.

Saturday, June 13, 2015

Lamb Kofta Kebabs


Oooh, these are so tasty.  So apparently koftas are part of Albanian, Afghan, Azerbaijani, Arab, Armenian, Balkan, Bangladeshi, Greek, Indian, Israeli, Irania, Kurdish, Pakistani AND Turkish cuisine in some form or another.  They can be lamb, beef, pork or chicken or some mix of meats, seasoned with lots of spices and shaped into small meatballs.  In some places like Iran, Iraq and Azerbaijan, they are served with a spicy gravy and a dry version (like the one here) are just called kebabs.  So I'm not exactly sure what type of Kofta this is, but regardless, it is delicious.

Lamb Kofta Kebabs

4 cloves garlic, minced
1 tablespoon kosher salt, plus a pinch
1 pound ground lamb
3 tablespoons grated onion
3 tablespoons fresh parsley, chopped
1 tablespoon ground coriander
1 teaspoon cumin
3/4 teaspoon cinnamon
1/2 teaspoon ground allspice
1/4 teaspoon cayenne pepper
1/4 teaspoon ground ginger
1/4 teaspoon black pepper
Bamboo skewers, soaked in water for 30 minutes
Grilled flatbread (naan, pita, or other flatbread)
Tomatoes
Lettuce
Tzatziki sauce (recipe below - although for the record, I always just buy premade tzatziki sauce from Sprouts or Whole Foods)

Smash the garlic cloves, sprinkle with a generous pinch of salt, and, with the flat side of a large knife, mash and smear mixture to a coarse paste. Mix the paste and the remaining 1 tablespoon salt with the meat, onion, parsley, and spices until well blended.

Form the mixture into 28 balls. Mold each ball around the tip of a skewer, flattening into a 2 inch oval; repeat with the remaining skewers. Place the kebabs onto a baking sheet lined with aluminum foil, cover, and refrigerate at least 30 minutes, or up to 12 hours.

Preheat an outdoor grill for medium heat, and lightly oil grate. Cook the skewers on the preheated grill, turning occasionally, until the lamb has cooked to your desired degree of doneness, about 6 minutes for medium.

Transfer to a serving platter and serve with tzatziki, flat bread, lettuce and tomatoes.


Tzatziki Sauce

2 cups plain whole milk yogurt or 1 cup Middle Eastern-style plain yogurt
1 medium cucumber, peeled, halved, and seeded
2 teaspoons kosher salt, plus a pinch
1/2 clove garlic
1 tablespoon extra-virgin olive oil
1 teaspoon lemon juice
1/2 teaspoon dried mint, crumbled

If you're using plain whole milk yogurt, line a small sieve with a coffee filter. Put the yogurt in it, set it over a bowl, and refrigerate 12 hours. Discard the expressed liquid and put yogurt in the bowl.
Grate the cucumber on the large holes of a box grater into another bowl. Sprinkle with the 2 teaspoons salt and rub into the cucumber with your hands. Set aside 20 minutes, then squeeze the cucumbers to express as much liquid as possible.

Smash the garlic, sprinkle with a generous pinch of salt, and, with the flat side of a large knife, mash and smear the mixture to a coarse paste. Stir the cucumber, garlic, olive oil, lemon juice, and mint into the yogurt. Refrigerate for at least 1 hour before serving.

Recipes adapted from Food Network.

Baked Macaroni & Cheese

It seems like there are 3 camp when it comes to mac & cheese.  Those who just want it out of the box (Kraft Mac & Cheese), those who prefer the ultra-creamy stovetop variety, and those who like the baked kind with extra cheese and/or breadcrumbs sprinkled over the top.  I fall into the third category and this recipe is a good jumping off point for that kind of macaroni and cheese.  I'm still searching for my perfect, ultimate recipe but I think it looks a lot like this, just maybe with different combination of cheeses.  Next time I make it I might replace the gruyere with something else like Monterey Jack or Emmentaler or ... I don't know.  Something.  When it comes to cheese, I have got a lot to learn.  I liked the thyme in the original recipe and kept it here but might omit that next time too and see if my girls like it better - while I loved the flavor it added, I think it made it a little less kid-friendly.
 
Baked Macaroni & Cheese
 
1 lb. macaroni pasta
3 tablespoons butter
3 tablespoons flour
4 cups whole milk
½ cup heavy whipping cream
3oz cream cheese
1 cup grated gruyere cheese
1 cup grated white cheddar
1 cup medium or sharp cheddar
1 tablespoon chopped fresh thyme
1 tablespoon Dijon mustard
1 teaspoon onion powder
Dash of ground nutmeg
Dash of cayenne pepper
Salt and pepper to taste
4-5 pieces of good white bread, slightly stale (I just leave it out on the stovetop for a few hours)
3 tablespoons butter, melted
 
Cook macaroni in salted water till al dente drain and cool. For cheese sauce, melt butter in large sauce pot add flour mix and cook for 3 minutes on low heat to make blonde roux. Slowly add cold half and half whisking in between additions to prevent lumps. Cook sauce for 5 minutes, add heavy cream, cream cheese, smoked cheddar, Dijon mustard, fresh thyme, onion powder, nutmeg, cayenne pepper, season with salt and pepper. Mix gruyere and 1 cup of white cheddar with cold pasta add cheese sauce mix well. In a food processor or blender, pulse bread into crumbs.  Pour butter over bread crumbs while pulsing, just to combine. Pour macaroni and cheese sauce into greased baking dish top with rest of white cheddar and the bread crumb mixture. Bake at 375 degrees for 30 minutes let stand 10 minutes before serving.
 
Adapted from a recipe found on The Vintage Mixer.

Sos Pwa Rouj (Haitian red beans and rice)

I served my mission in New Jersey from 2001-2003.  My favorite time of my mission was spent in my third area of Irvington, where many of the people I met and interacted with had recently emigrated from Haiti.  My companion and I ate some memorable meals with these wonderful people, but my very favorite was called Sos Pwa and the Haitians ate it all the time.  I asked a number of them how to make it but never got any clear recipe from any of them, although I understood that the basics of it was cooking the beans with some spices until they were soft, then pureeing a portion of them to create a sort of "gravy" or sauce which was added back to the whole beans and then poured over plates of white rice.  It might not look like much, and it is certainly simple food being just rice and beans but it is delicious.  On special occasions they would serve it with conch meat, but I prefer it with grilled shrimp.  Sos Pwa can be made with any type of bean, really - black, red, pink, or white - but red and pink were my favorites. 

Sos Pwa Rouj

2 cups dried red kidney beans (or pink beans)
1 tablespoon oil
1/4 red or green bell pepper, diced
1/2 onion, diced
3-4 garlic cloves, minced
1 shallot, minced
1 tablespoon tomato paste
2 teaspoons salt, or to taste
1/4 teaspoon black pepper, or to taste
1 thyme sprig

Rinse beans then bring to a boil in a large pot with 8 cups of water.  There is no need to soak beans beforehand.  Turn down heat and simmer beans, covered, adding water as needed. 

Heat oil in a pan over medium heat, then cook pepper, onion, cloves, shallot and tomato paste for about 5 minutes until onions soften.  Add to beans along with salt, pepper, and thyme. Cook for another 30 minutes to an hour, or until beans are tender. 

Drain and reserve the liquid from the beans.  You will need about 3 cups of liquid so if there is not enough left from cooking the beans then add some water.  Put 1/4 to 1/2 of the beans into a blender, along with the reserved liquid and blend until completely smooth to create a sort of sauce or "gravy" as my friends from Haiti called it.  Return the sauce and the remaining beans to the pot and stir to incorporate.  Serve over hot white rice.

Sunday, June 7, 2015

Panang Curry Salmon

Paul declared this to be one of his favorite was I have ever made salmon.  It is definitely on the higher end of the spicy scale for what I usually make, but it is oh so delicious and poaching the salmon in the panang curry is just wonderful.

Panang Curry Salmon

1 cup coconut cream (usually >25% fat content)
4 tablespoons Panang Curry paste (you can find pre-made pastes at your local Asian supermarket)
4 serving size salmon fillets
1 16 ounce can coconut milk (around 8% fat content), divided
1/2 cup water
1 tablespoon brown sugar
2-3 tsp fish sauce
1/2 large red chili, fresh and shredded, for garnish
2 kaffir lime leaves, finely shredded, for garnish

Bring the coconut cream to a boil in a wok or large saucepan over medium-low heat until oil appears on the surface.  Add curry paste and stir for 1 minute until it is incorporated into the coconut cream.

Add 1 cup of coconut milk. Stir until thoroughly blended and bubbling. Add salmon and continue cooking for 2-3 minutes.  Flip salmon and add remaining coconut milk and water, gently mix.

Heat until boiling and continue cooking at medium heat until salmon is done (3-4 minutes).  Sprinkle sugar over, mix in and adjust seasoning to taste.  Then add remaining coconut milk and bring to a boil. Add the brown sugar and fish sauce.

At the last moment, add the shredded red chili and kaffir lime leaves (if you have them) then remove from heat and serve with Thai Jasmine rice and freshly steamed vegetables.

Friday, May 29, 2015

Cinnamon Salmon


Cinnamon Salmon

12 ounces salmon fillets (about 2 fillets)
1/4 cup soy sauce
1 teaspoon lemon juice
1/2 teaspoon ginger
1/4 teaspoon cinnamon
1/8 teaspoon pepper

Preheat oven to 325 degrees.  Mix together soy sauce, lemon juice, and spices.  Place salmon in a shallow baking dish, and pour liquid mixture over the filets.  For more flavor, marinate for up to 1 hour or just bake immediately.  Bake about 25 minutes or until salmon is flaky.

Thursday, May 28, 2015

Paul's Smoked Turkey


Paul's Smoked Turkey

For the Brine
 
10.4 ounces salt (2 cups Diamond Crystal kosher salt OR 1 1/3 cups Morton kosher salt OR 1 cup plus 2 tablespoons fine sea salt)
1 1/4 cups packed dark brown sugar
1/4 cup whole black peppercorns
2 tablespoons allspice
2 gallons cold water
1 bag of ice
1 clean 5-gallon bucket with lid
 
For Smoking the Turkey
 
1 12- to 15-pound thawed turkey
1 Granny Smith apple (quartered)
1 yellow onion (quartered)
Fresh sprigs of thyme
Olive oil
Melted Butter
Rosemary
Butcher’s twine
Apple wood pellets
 
Initial Preparation and Brining
 
In the bucket, combine water, salt, brown sugar, peppercorns and allspice. Rinse the turkey inside and out, remove giblets and discard or save for later use. Slide the turkey into the bucket of brine, making sure it is fully immersed. Place the bag of ice on top of the turkey to keep it submerged fully in the bucket. Place the lid on the bucket and set aside to brine overnight.
 
Final Preparation and Smoking
 
Remove the turkey from the brine, drain and pat dry with paper towels. Fold the wingtips behind the back and tie the legs together with butcher’s twine. Stuff both the main cavity and the neck cavity with the quartered apple, onion and fresh thyme.
 
Start the smoker on Smoke with the lid open until the fire is established (4 to 5 minutes). Place the turkey directly on the grill grate, breast side up. Close lid and let the turkey smoke on the Smoke setting for 1 1/2 to 2 hours.
 
Combine the melted butter and rosemary in a small bowl. After initial Smoke, baste the turkey with the butter/rosemary and turn the Smoker up to 350 degrees. Smoke the turkey for an additional 2 to 2 1/2 hours, or until the internal temperature in the thickest part of the thigh is 165 degrees Fahrenheit (use an instant-read meat thermometer).
 
Remove the turkey and let it rest at least 20 minutes before carving.

Thursday, May 14, 2015

Empanadas Arregladas (Costa Rican Empinadas)


Empanadas Arregladas

2 cups Masa Harina (Maseca)
1/2 teaspoon salt
1 1/4 cups hot water
1 teaspoon achiote powder (optional; also called annatto)
1 cup cooked Tica-style black beans
1 cup queso fresco
3 cups vegetable oil

Cabbage Salad

1/2 cabbage, chopped into narrow strips
1 large tomato, diced
Juice from 1/2 lemon (unless lemon is small, then use the juice from the full lemon)
Salt and pepper

Heat the oil in a large pan over medium heat.  Add the achiote powder to the hot water and stir to dissolve.  Make a hole in the center of the masa in a bowl, and slowly add water, a little at a time.  Using your fingers, mix the masa and water together until it all comes together and forms a ball.  It will be about the consistency of playdough.  Make balls with the masa slightly larger than the size of a golf ball.  Place the ball between to sheets of parchment paper, then press down hard with the bottom of a plate to form a tortilla.

Remove the top sheet of parchment paper and fill masa tortilla with about 1 teaspoon of cheese and 1 teaspoon of beans (or all beans, or all cheese, or a shredded chicken mixture).  Do not overfill.  Fold one side of the tortilla over and press edges down to seal the empanada. 


When all empanadas are prepared, gently lower a few at a time into the hot oil using tongs (very important as the water in the empanada dough will sizzle and pop quite a bit) and fry for about 3 minutes per side until golden brown.  Be sure not to crowd the pan.  Remove from oil and place on a plate lined with paper towels.


To prepare the cabbage salad, mix the cabbage and tomatoes, squeeze the lemon juice over them, and season with salt and paper to taste.   

Serve empanadas with cabbage salad and sour cream.  I like guacamole for them too, even though that is a Mexican thing and not something you would see in Costa Rica.

Friday, May 8, 2015

Potstickers


I am lucky to have a friend who shares my enthusiasm for trying to make dishes that we have never made before so when I mentioned potstickers she was totally up for the challenge.  She even took me and the girls on a field trip to the Asian market to pick up our ingredients, which was foreign to me both because everything was in Chinese but also because I basically never cook or even eat Chinese or Japanese foods.  Its a shortcoming I am trying to rectify. 
 
Anyway, with premade potsticker wrappers, it isn't difficult at all to make these savory little bites.  Served up with Asian stir-fry vegetables and Spicy Soy Potsticker Sauce, this makes a delicious  and satisfying dinner.


Potstickers (recipe by my friend Amy Barrett)

1 pound ground pork
4 cups Napa cabbage, finely chopped
¼ scallions, finely sliced
2 eggs, lightly beaten
2 teaspoons brown sugar
3 teaspoons salt
1 teaspoon pepper
½ teaspoon cayenne pepper
4 tablespoons minced garlic
4 tablespoons minced ginger
1 tablespoon sesame oil
1 tablespoon chili oil
70-80 potsticker (round) wrappers
Vegetable oil for frying
4 cups chicken broth

Combine the first twelve ingredients in a large bowl with your hands.  Place one heaping teaspoon of filling into the center of a potsticker wrapper.  Trace water around the edges of the wonton wrapper.  Fold wrapper in half and press closed to seal potstickers.  Place assembled posticker on a baking pan lined with foil and cooking spray until ready to cook.  Repeat steps 2-5 until all the filling or wrappers have been used.

Heat a large frying pan on medium-high heat with enough oil to coat the bottom surface of the
pan.  Place an single layer of potstickers flat side down in the pan and cook until wrapper turns to a
medium brown (about 2 minutes).  Add 1/3 cup chicken broth to the hot pan, turn heat to low, cover, and cook for an additional 2 minutes.  Gently remove potstickers from pan, being careful not to tear delicate wrapper.  Pour water into hot empty pan to deglaze and pour out when crispy bits have loosened.  Repeat until all potstickers have been cooked.

Serve with Spicy Soy Dipping Sauce.

Thursday, April 16, 2015

Chicago Deep Dish Pizza

 
Okay, so I have never been to Chicago and have never truly had Chicago Deep Dish Pizza.  But this recipe is supposedly as close as you can possibly get to the real thing.  It is from the America's Test Kitchen cookbook, which is basically my favorite cookbook ever.  This isn't like any other normal kind of pizza.  The crust has cornmeal and is laminated with butter, and the position of the cheese and sauce are reversed so that the crust doesn't get soggy.  You eat it with a knife and a fork instead of just using your hands.  But it is hands down one of the best things I make.  At least in my opinion.  And while I actually prefer it with just cheese, which makes it a meatless, vegetarian meal, you can add sausage, peppers, carmelized onions - basically any pizza toppings you can think of.

The laminating process is cathartic for me.  You get to roll out dough, spread it with soft butter, then fold it in out itself, let it rose and roll it out again.  It creates wonderful, buttery layers of crust that are totally unlike regular pizza.


And the homemade sauce is unbelievable.  I mean, its basically just tomatoes and fresh basil and garlic, but wow, it is just so, so good.


If you decide to do a sausage pizza, just sprinkle small chunks of sausage over the cheese layer before topping with sauce and baking the pizza.  The sausage will cook through in the time that it takes for the pizza to cook.  Of you can do the cheese layer, a sauce layer, and then put the toppings on top so you can see them.  It really doesn't matter.


Chicago Deep Dish Pizza (makes two 9-inch pizzas, serving 4-6)

Dough

3 1/4 cups (16 1/4 ounces) unbleached all-purpose flour
1/2 cup (2 3/4 ounces) yellow cornmeal
1 1/2 teaspoons table salt
2 teaspoons sugar
2 1/4 teaspoons instant or rapid-rise yeast
1 1/4 cups water (10 ounces), room temperature
3 tablespoons unsalted butter , melted, plus 4 tablespoons, softened
1 teaspoon plus 4 tablespoons olive oil

Sauce

2 tablespoons unsalted butter
1/4 cup grated onion , from 1 medium onion (note, we left this out)
1/4 teaspoon dried oregano
Table salt
2 medium garlic cloves , minced or pressed through garlic press (about 2 teaspoons)
1 (28-ounce) can crushed tomatoes (see note)
1/4 teaspoon sugar
2 tablespoons coarsely chopped fresh basil leaves
1 tablespoon extra-virgin olive oil
Ground black pepper

Toppings

1 pound mozzarella cheese , shredded (about 4 cups)
1/2 ounce grated Parmesan cheese (about 1/4 cup)
1/2 pound bulk Italian sausage
Pepperoni
Caramelized onions
Yellow, green or red peppers
Spinach
Mushrooms
Olives

FOR THE DOUGH: Mix flour, cornmeal, salt, sugar, and yeast in bowl of stand mixer fitted with dough hook on low speed until incorporated, about 1 minute. Add water and melted butter and mix on low speed until fully combined, 1 to 2 minutes, scraping sides and bottom of bowl occasionally. Increase speed to medium and knead until dough is glossy and smooth and pulls away from sides of bowl, 4 to 5 minutes. (Dough will only pull away from sides while mixer is on. When mixer is off, dough will fall back to sides.)

Using fingers, coat large bowl with 1 teaspoon olive oil, rubbing excess oil from fingers onto blade of rubber spatula. Using oiled spatula, transfer dough to bowl, turning once to oil top; cover tightly with plastic wrap. Let rise at room temperature until nearly doubled in volume, 45 to 60 minutes.

FOR THE SAUCE: While dough rises, heat butter in medium saucepan over medium heat until melted. Add onion, oregano, and 1/2 teaspoon salt; cook, stirring occasionally, until liquid has evaporated and onion is golden brown, about 5 minutes. Add garlic and cook until fragrant, about 30 seconds. Stir in tomatoes and sugar, increase heat to high, and bring to simmer. Lower heat to medium-low and simmer until reduced to 2 1/2 cups, 25 to 30 minutes. Off heat, stir in basil and oil, then season with salt and pepper.

TO LAMINATE THE DOUGH: Adjust oven rack to lower position and heat oven to 425 degrees. Using rubber spatula, turn dough out onto dry work surface and roll into 15- by 12-inch rec-tangle. Using offset spatula, spread softened butter over surface of dough, leaving 1/2-inch border along edges. Starting at short end, roll dough into tight cylinder. With seam side down, flatten cylinder into 18- by 4-inch rectangle. Cut rectangle in half crosswise. Working with 1 half, fold into thirds like business letter; pinch seams together to form ball. Repeat with remaining half. Return balls to oiled bowl, cover tightly with plastic wrap, and let rise in refrigerator until nearly doubled in volume, 40 to 50 minutes.

Coat two 9-inch round cake pans with 2 tablespoons olive oil each. Transfer 1 dough ball to dry work surface and roll out into 13-inch disk about 1/4 inch thick. Transfer dough to pan by rolling dough loosely around rolling pin and unrolling into pan. Lightly press dough into pan, working into corners and 1 inch up sides. If dough resists stretching, let it relax 5 minutes before trying again. Repeat with remaining dough ball.

For each pizza, sprinkle 2 cups mozzarella evenly over surface of dough. Spread 1 1/4 cups tomato sauce over cheese and sprinkle 2 tablespoons Parmesan over sauce. Bake until crust is golden brown, 20 to 30 minutes. Remove pizza from oven and let rest 10 minutes before slicing and serving.

Baked Pinto Bean and Swiss Chard Burritos


I like to try to do meatless meals at least one night a week at our house and these burritos are perfect when it comes to having a vegetarian option that in no way tastes or feels vegetarian.  If you didn't mention to somebody that you were doing a vegetarian dinner, they would have no clue and wouldn't miss the meat at all in these burritos.  One thing I really love about this recipe is the use of swiss chard, which I had never cooked before but had always wanted to try because it is almost always available at the farmer's market and it is so colorful and bright.  The recipe is from a new cookbook I bought called "The Complete Vegetarian Cookbook" by America's Test Kitchen, so I knew going into this recipe that it would probably turn out amazing and I can't wait to try out more meatless meals to add options to our vegetarian nights.
 

Baked Pinto Bean and Swiss Chard Burritos

2¼ cups vegetable broth, divided
¾ cup brown rice, rinsed
6 cloves garlic, minced, divided
1 teaspoon kosher salt
¼ cup minced fresh cilantro
1 tablespoon vegetable oil
1 onion, finely chopped
3 tablespoons tomato paste
1 teaspoon minced chipotle chile in adobo sauce
1 tablespoon ground cumin
1 teaspoon dried oregano
1 lb. Swiss chard, stemmed and sliced into 1-inch wide strips
1½ cups cooked pinto beans (1 15 oz. can), rinsed, divided
1 tablespoon lime juice
6-7 10-inch flour tortillas
10 oz. Monterey jack cheese, shredded (about 2½ cups), divided

In a small saucepan over medium-high heat, combine 1¼ cups of the broth, the rice, half of the garlic, and ½ teaspoon of the salt. Bring to a boil. Cover, reduce the heat to low and cook until the rice is tender and the broth has been absorbed, about 45 minutes. Remove from the heat and let sit, covered, for 10 minutes. Add the cilantro and fluff with a fork to incorporate. Cover to keep warm.

Meanwhile, in a Dutch oven, heat the oil over medium heat until shimmering. Add onion and cook until just beginning to brown, about 5 minutes. Stir in the tomato paste, chipotle, cumin, oregano, remaining garlic, and the remaining ½ teaspoon of salt. Cook until fragrant, about 1 minute. Add the chard and ½ cup of the broth, cover and simmer until the chard is tender, about 15 minutes.

Using a potato masher or a fork, coarsely mash half of the beans with the remaining ½ cup of broth in a bowl, then stir into the pot. Cook, stirring constantly, until the liquid is nearly evaporated, about 3 minutes. Off the heat, stir in the lime juice and remaining whole beans. Cover to keep warm.

Adjust an oven rack to 6 inches underneath the broiler element and heat the broiler. Wrap tortillas in a damp dish towel and microwave until warm and pliable, about 1 minute. Lay warm tortillas on a work surface. Mound warm rice, chard-bean mixture and 1½ cups of the cheese in the center of the tortillas, close to the bottom edge. Working with 1 tortilla at a time, fold the sides of the tortilla over the filling, then fold up the bottom of the tortilla, pulling back on it firmly to tightly wrap around the filling and into a burrito.

Place the burritos seam side down on a foil-lined baking sheet. Sprinkle the remaining 1 cup of cheese over the top. Broil until the cheese is melted and starting to brown, 3-5 minutes. Serve warm with sour cream and guacamole.

Friday, April 3, 2015

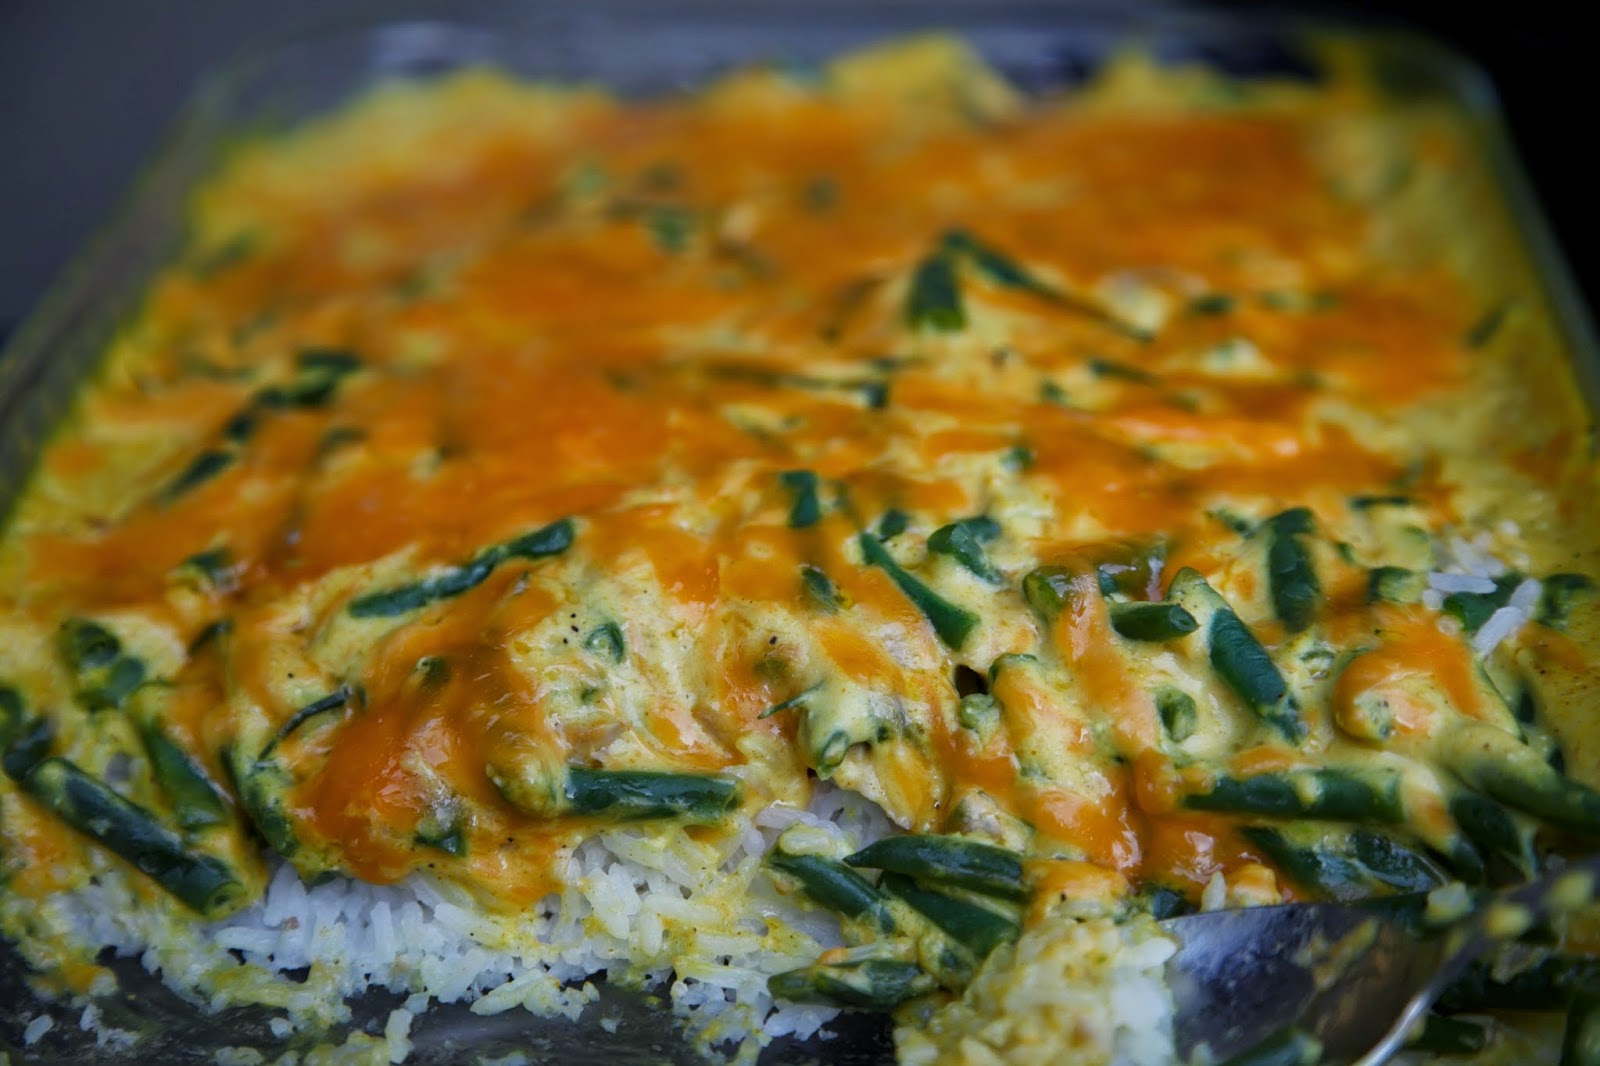
Cheesy Chicken, Green Bean & Rice Casserole


Casseroles get a bad rap and it is too bad.  I mean, they are (at least theoretically) a balanced meal in one dish.  There are definitely some bad casseroles out there, but if you have ever had a really, really good casserole you will know how truly great they can be. 

Really this was originally chicken, broccoli, and rice casserole, but I substituted fresh French green beans in place of the broccoli and it was wonderful. So you could use broccoli if you prefer and it would be great.  When I was a growing up, I would ask for this casserole every year for my birthday dinner and it is still one of my favorite comfort foods. And Clara and Rose both love it too, which makes it a perfect meal to serve on a weeknight.


Cheesy Chicken, Green Bean & Rice Casserole

About 2 1/2 cups prepared Jasmine rice
1-2 cups chopped or shredded chicken breast (I like using leftover greek chicken but you can use a rotisserie chicken from Costco to make things easy)
1 1/2-2 cups green beans, chopped into bite size pieces and steamed just until tender but not overcooked
1 small can cream of chicken soup
1 cup plain greek yogurt
2-3 tablespoons curry powder, to taste
1 1/2 cups shredded sharp cheddar cheese, divided
 
Cook rice, green beans and chicken ahead of time.

In a bowl, stir together the cream of chicken soup with the greek yogurt and curry powder. Add about 1 cup of the shredded cheese and stir to combine.

In a 9x13-inch casserole dish, layer rice first, then distribute chopped or shredded cooked chicken over it, followed by the green beans (or broccoli, if you prefer). Top with dollops of the chicken soup mixture and spread out to cover the casserole, then sprinkle with remaining 1/2 cup of shredded cheese.

Cover casserole with aluminum foil and bake in the oven at 425 degrees for about 30 minutes, or until everything is hot and cheese has melted.

Saturday, March 28, 2015

Chicken Tikka Masala

 
One of my college roommates, Corey, introduced me to Chicken Tikka Masala at the Bombay House in Provo, Utah when I was a sophomore and I fell in love.  Paul and I lived just a block from the restaurant for the first couple of years of our marriage and we would often go there to share this dish when a recipe failed or when we were craving Indian food.  But after moving away I haven't been able to find any chicken tikka masala I like nearly as well as that served by Bombay House, and I've even tried it in Indian food meccas like Washington, D.C., London, New York and California.  After stumbling on some recipes that purported to be perfect Bombay House copycats (close, but they definitely weren't the same thing), I tweaked, combined, and worked out how to make my own version that - dare I say it? - rivals or even surpasses that of Bombay House.  For me, this is ultimate comfort food - rich, spicy (but not too spicy), and fresh.  And I like to double the batch so I have leftovers for Chicken Tikka Masala Pizza later in the week.
 
* As a note: I leave out the jalapeno altogether and use only 1 1/2 cups of the cream because I don't want my girls to balk at the spiciness. 
 

Chicken Tikka Masala (Bombay House Style)

Marinade

1 cup plain yogurt
1 1/2 tablespoons lemon juice
2 teaspoons cumin
1 teaspoons ground red pepper (cayenne)
1 teaspoon black pepper
1 teaspoon cinnamon
1/4 teaspoon salt
1 tablespoon peeled, minced fresh ginger
1 teaspoon garam masala
3 boneless, skinless chicken breasts, cut into 1-inch chunks
 
Sauce
 
1 tablespoon butter
3 garlic cloves, minced
1 jalapeño, minced (optional)
2 teaspoon ground coriander
2 teaspoon cumin
1 teaspoon paprika
1 teaspoon garam masala
1/2 teaspoon salt
1 1/2 cups canned tomato sauce
1 1/2 to 2 cups heavy whipping cream
1/4 cup chopped cilantro
              
Combine all marinade ingredients in a glass container. Add chicken pieces, cover with a tightly sealed lid, and toss to coat. Allow chicken to marinade for 1 hour.
               
In a large saucepan over medium heat, melt the butter. Stir in the garlic and cook until fragrant, stirring frequently. Add the jalapeno (if using), coriander, cumin, paprika, garam masala and salt and stir to combine. Stir in the tomato sauce and simmer for 15 minutes until thickened.
 
Meanwhile, thread the chicken onto soaked skewers. Discard remaining marinade. Grill the chicken on a hot grill for 5 minutes on each side until the chicken is done. Remove the chicken from the skewers and keep warm.
 
Transfer the chicken to the simmering sauce and stir in the cream. Allow to simmer another 10 minutes or so until sauce thickens slightly. Transfer to a serving dish and garnish with the cilantro. Serve with basmati rice and garlic naan.

Adapted from Mattawa Mum and I can't wait to try her Chicken Coconut Kurma!